
i'm one of those people that gets a very clear vision in her head of what she hopes and dreams something will turn out like...and 100%, without fail, every SINGLE time...the result is a messy disaster. either that or i have to rig it in such a way that it kind of looks like something that might resemble the original...you get the picture.
let's just say i've said, "it's the thought that counts!" and "i made it with love!" a lot.
but this time, folks, i get to toot my horn.
i followed the instructions perfectly. to the "t." i read them start to finish at the beginning and then followed each step to the letter. there would be no effing this one up.
so let's get to it.
miss amy, over at the farmer's wife, had a birthday. obvs. i had to make her a cake because i knew she would share it with me. (and she did.)
i jumped on pinterest and picked out my goodies and got to work.
1. first you make a delicious box cake. but not just any box cake. you add all sorts of glory to it to make it better (read: more fattening) than a box cake. you can find the instructions here. you basically add an extra egg, use butter instead of oil, and milk instead of water. and it's yum. i've done it twice now...no complaints.

i made two 8" rounds and let them cool upside down. by cooling them upside down it's supposed to help them flatten up for stacking purposes.
2. the next step is to put one cake on a stand of some sort. if you don't have a cake stand you can put a plate on an upside down bowl, like me. but before you put your cake down, cut four strips of wax or parchment paper and make a box. this will help you keep your plate clean for a glorious presentation, right? brilliant. also, to hold your bottom cake in place, plop a little dollop of frosting in the center of the plate and then place your cake on top of that dollop.

3. you'll now begin to frost your bottom layer. use about a cup and a half of frosting and plop it in the center of the cake. then i just used a knife to work the frosting out towards the edges turning the plate as i went. once the frosting started pushing over the edges i just left it and got to work on the top layer.
4. for the top layer you're going to take the second cake and place it on top of the bottom cake upside down. this will create a flat surface for the top of your cake and will look real real nice with whatever decorations you choose.
take another cup or one and a half cups of frosting and, starting from the center, push the frosting out towards the edges evenly, letting it droop over the sides.


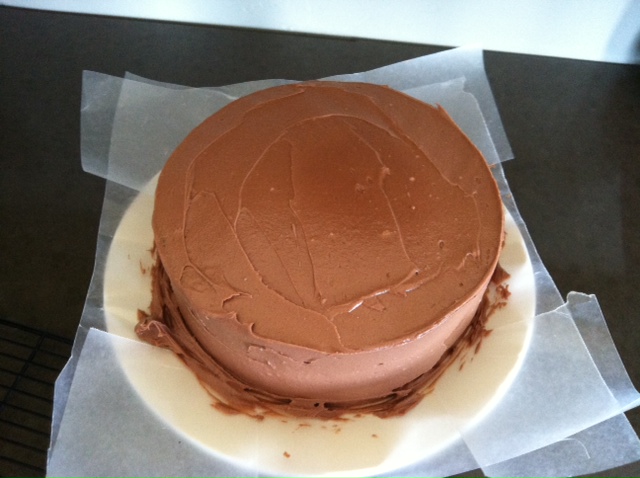
great, now that you have copious amounts of frosting precariously sticking to your cake, begin smoothing that excess frosting around the sides of the cake. and guess what...no big deal that the excess frosting is probably dripping onto your plate...because you put paper down. win.
5. is your cake frosted? does it look beautiful? how does the frosting taste? absolutely delish, like mine?
for those of you that have read, i have a bit of a nutella problem. the stuff CALLS to me. so when i saw a nutella cloud frosting recipe on pinterest...i knew we were meant for each other.
so, unselfishly, i knew i had to make the nutella frosting for amy's cake. and i did. and it was wonderful.

6. now that your cake is beautifully frosted and the excess frosting is clearly cramping it's style, it's time to remove your paper.
voila!


perfection, right? not a spec of frosting on that plate! granted, the cake is a little off-center, but hey, i'm not perfect, jack.
speaking of jack...do y'all watch duck dynasty? it's become a bit of an issue in our household. i never thought in all my years i would watch a show as such and now i'm following them on instagram. #shame #idontcareiloveit
7. i found these adorable chalkboard, bunting, letter flag things on pinterest and of course i had seen the adorable displays people did on cakes, cupcakes, desserts of all shapes and sizes and knew i wanted to make my cake adorable by putting the adorable bunting on my already adorable cake...unfortunately...that shizz is harder than it looks. not only is tying the string to the straw tricky (because i have fingers like small clubs), but you also have to think about the spacing, and the word length and the angles and blah blah blah...this is what mine ended up looking like:


can't win 'em all.
8. and the final step is transportation. i plopped that sucker on the floor of my car and drove like a bat out of hell down our sweet country, farm roads all the way to amy's.

we arrived safely...no cakes, persons, or animals were harmed en route. actually...if i recall correctly, i nailed a bird on my way home.
thank you oh so much for doing sharzies with your birthday cake amy! miss kaye and i looooved it and i hope you did too! xo!

the cake looks good and yummy. you should see when i'm in the kitchen. it says you shouldn't let me around near it.
ReplyDeleteUh... this is the first time I've seen this. How lame am I!? LOVED the cake gal. You're the best!!! :)
ReplyDelete